
Track Grouping
Introduction
As a session begins to build, you need as many ways to control you mix as quickly as possible, track grouping is certainly one such method.
Track grouping allows you to adjust a setting or control of a pre-defined set of tracks using just one control, whether it be a fader adjustment or even muting, the function allows you to work with groups of instruments as one as opposed to wasting time making individual adjustments.
Track grouping will allow you to quickly solo a group of tracks such as a full drum kit, or pull down the levels of a group of tracks, these are two common uses but it has an enormous potential which is only restricted by your creative ideas.
This tutorial will show you how to create, modify, and enable/disable track groups as well as hopefully giving you enough background to go into your sessions and start using them creatively to benefit your production process.
Groups List
You may have already noticed that in the bottom left hand corner of the screen lies the Groups List as shown below.
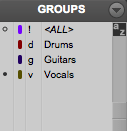
Notice that by default, a group is created called ALL, as i’m sure you can work out this group will consist of every track within the session and should not be overlooked!
The screen shot above shows three groups, the left-hand column of each group shows the group symbols. A small dot indicates that all members of the group are selected, an empty circle indicates that some members of the group are selected whilst a dot within a circle indicates that all group members plus other tracks are selected.
The next column displays a unique colour for that group to help tell them apart.
The third column will display a single letter value which can be used to turn that group on and off, we will talk a little more about this later on in the tutorial.
The fourth and final column displays the group name, this can be set when you create the group and modified afterwards if needs be.
To help make a little more sense of what these columns mean, let’s now look at creating a group and setting up its values.
Creating Groups
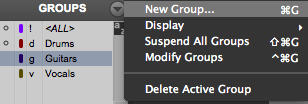
Groups can be created in one of two ways, firstly from the groups list we mentioned in the last section. In the top right hand corner of the list you will see a small downwards arrow, when clicked you will be presented with a number of options which includes ‘New Group‘.
The other way of bringing up the ‘Create Group‘ dialog window is by using the shortcut CMD_G (mac) CTRL_G (windows).
After using either of the two methods, you will be presented with the dialog window where you can set each of the parameters.
Setting Up The Group

Let’s start by looking at the two tracks lists half way down the screen, the left hand list shows all available tracks within your session, and the right hand list shows the tracks that are going to be added to the group you are creating. By highlighting tracks and using the ‘Add/Remove‘ buttons underneath, you can move tracks between columns. Now lets look at the options at the top of the window.
The first option you are given is the group name, rather than leaving this as it is, it is very much worth giving your group a short but distinctive name to help find your groups quickly while mixing. To the right of this option you will also be able to assign a letter ‘ID‘ to your group, I prefer to choose a letter which is related to the group title, for example I will use ‘D’ for drums and ‘B’ for bass, it is up to you whichever letter helps you to distinguish them apart, we will talk about where this letter comes into work later on.
The next option you have for the group is ‘Type‘, you will be presented with three options which include Edit, Mix, and Edit and Mix.
Edit: Creating a track group of this type will link track parameters which are more commonly associated within the Edit window including, Region editing, Automation, as well as the tracks height, view and timebase.
Mix: Creating a track group of this type will link track parameters which are more commonly associated within the Mix window including, Fader and Send levels as well as Mute and Solos.
Mix and Edit: This will of course be a combination of both and is generally the most popular choice as there are probably only few occasions when you would not want to change everything together.
It does not matter however if you choose a group type which is missing a particular link you require as you will see that the final option when creating a group is whether you wish to link the Solo, Mute, Send Mute, and Send Levels of the tracks within the groups. It is important to remember that these checkboxes ultimately decide whether those features are linked or not, for example if you chose Edit and Mix type group but then left the Mute box unchecked, then the other group tracks would not follow if one was muted.
Enabling/Disabling Groups
Now that you have created your groups, you will need to know how to turn them on and off. The first way is by clicking the small dot to the left of the group name on the groups list as described earlier.
The other way which I personally find much quicker is by using Commands Focus, if you are unsure about this area, then you should first read our article about it HERE. This is where the ID associated with the track comes into play, while in Groups Commands Focus you can enable and disable track groups simply by pressing the ID key to which they are associated.
Group List Options
You will have probably noticed while working within the group list menu that there were three other options available, Modify, Duplicate and Delete.
Modify Group: This will bring up the group window again, giving you the opportunity to make any changes such as adding additional tracks to an existing group for example.
Duplicate Group: This will make an exact copy of an existing group, I find this particularly useful when I have two groups of instruments which I wish to have the same group settings.
Delete Group: This really needs no explanation, the groups selected will be deleted.
Final Words
We hope you have enjoyed this tutorial, but more importantly we hope that you will be able to start using groups within your sessions to enhance your workflow.

I enjoyed the free version so much until I purchased groupings pro since then I have added quite a few of my phone numbers to the groups…as of last month I have not been able to add any more phone numbers to any of the groups ….Need help!!
Hello i’m having trouble,Deleting the groups. Everytime i want to move 1 track i select moves all my tracks.how do i fixs this
Go into the mix window, , left click on the group tab, and select modify. Change the type to “mix” – now only parameters in mix window will change with the group (for panning, volume, etc) while changes in the edit window (trimming, fades etc) will function on the single track.
Or, you could delete the group entirely in the same drop down tab as “modify”, but this can’t be undone so beware.