
Filtering
Introduction
In this tutorial we will shed some light on the terms and definitions associated with filtering and why filtering is an essential process during your productions.
Filtering is a process based around equalisation, while the term filtering could refer to cutting a narrow band of unwanted frequencies, this tutorial will focus on cutting a much broader range of frequencies at the top or bottom end of the spectrum where audio content may exist which can cause issues in a mix… More on this later.
Term Confusion
You may have heard a number of terms related to filtering, it seems that most confusion comes from different terms meaning the same thing, so let’s start by clearing up some of the wordings you may come across and exactly what they mean…
Cut: One of the more obvious terms, this simply refers to a range of frequencies being lowered in level.
Pass: Often confused with boosting, the term pass refers to the frequencies which are left while others are cut. For example, you might hear “stick a high pass filter on that…” this means that the low frequencies will be removed allowing only the mid and high to be audible – or ‘pass’ through the filter.
Slope/Roll-off: This terms refers to how sharply the frequencies are cut when filtering. A sharper or steeper slope or roll-off will mean that frequencies are cut very close to the set cut-off value while a ‘smoother’ slope will mean that the cutoff frequency set, some of the frequencies before or after it (depending on which filtering you are applying) will still be audible albeit quieter than before. The idea here is to blend the sound so that the cut isn’t noticeable in the final mix – there are some applications where a steep roll-off works just fine though.


Examples
Now that we have cleared up the terms, let’s take a look at what some of the filters will look like within Pro Tools and listen to what kind of sonic effect they will have.
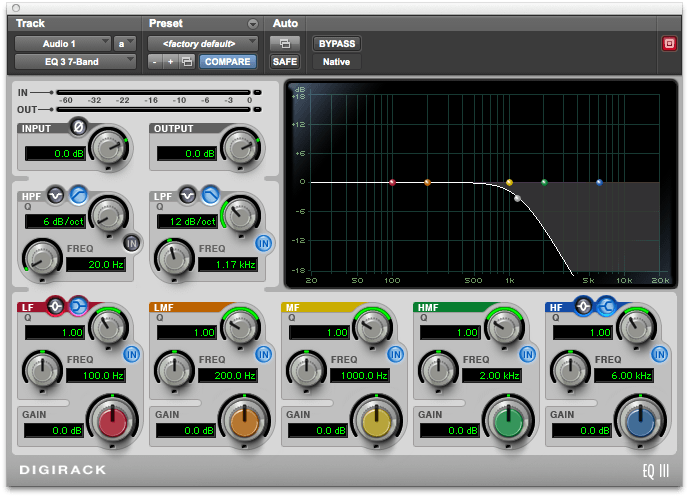
We will start by looking at a low cut filter, also known as a high pass filter. The shape of this kind of filter can be seen below within the in-built 7-band equaliser which comes with Pro Tools, remember however that the slope of the cutoff can be set as sharp of smooth as you like depending on the intended effect.

The audio example above features a white noise sample with a sweeping low cut filter starting at 20Hz and ending at 2KHz.
Secondly let’s get familiar with a high cut filter, also referred to as a low pass filter. The image below again shows the 7-band equaliser within Pro Tools showing a typical high cut filter shape.
The audio example above features a white noise sample with a sweeping high cut filter starting at 20KHz and ending at 500Hz.
High and low pass filters can also be used together to allow a specific band of frequencies to be left (as shown below), you may remember this technique from our telephone sound effect tutorial.

If you would like to get this kind of sound yourself, then you can combine the techniques in this tutorial along with our other guides on sidechain compression here, and plug-in automation here.
Mix Applications
While the filtering techniques heard above make nice production effects, very subtle filtering to the tracks within your mix can be the start of a great sounding mix which translates well on a range of playback systems, let’s have a look at how it can benefit your mixes.
In my opinion, one of the main issues within a mix can be the low end frequencies, if not addressed correctly they can quickly make the mix sound muddy and weak. While you may be aware of the low frequencies within tracks such as the bass and kick drum which need attention, you may not be so aware of how many other tracks contribute to the low-end. A simple spectral view plug-in will show exactly what is going on within your tracks.

Take a look above at the response of a vocal recording within Blue Cat Audio’s frequency analyser. While the bass frequencies, which may have come from something as simple as a vibrating stand, may seem too low in level to cause any problems, it is the summing of all of these frequencies across all of your tracks which unknowingly build to clash with your bass-predominant instruments. The other consideration you may not make with tracks like this as well are the effects you apply, imagine a vocal with lots of low end material like this and then you add your usual reverb and delay plug-ins, next thing you know you have unwanted frequencies being spread even further around your session.
The best advice for this kind of process is to simply use your ears, if you think the track you are hearing doesn’t need sub-low frequencies then get rid of them and you will notice your session fall together much quicker. Even a filter up to just around the 80Hz mark will give significant results allowing your bass and kick drum to shine through within your mix.
Speaker Results
We will now look in just enough detail to help you understand how filtering can also benefit how well various playback systems will handle your mixes. The basic layout of most playback monitors (speakers) includes a cone which handles low frequencies, a bubble looking ‘tweeter’ which handles the high frequencies and occasionally you will also find bass-ports taking the form of holes from the outer case to the hollow inside of the loudspeaker which allows air to move more freely resulting in a better bass response.
When you play your mixes through the speaker, the cone (also knows as the driver) vibrates according to the waveform being playing back (as shown in the diagram below), the lower the frequency, the slower the movement of the cone.

This cone is constantly moving to playback all of the low frequencies your are feeding into it, comparing to this to what we were talking about in the previous section, if the cone is wasting movement playing unwanted low-end frequencies of your vocal track for example, it may struggle to precisely playback the key bass elements over everything else. In other words, sensible filtering on the tracks within your session will give your mixes much more clarity and will also result in a better performance from a range of different playback monitors; from cheap computer speakers to expensive studio quality monitors.
Final Words
We hope that you have found this tutorial useful and that it helps you to solve some of the low-end issues you may be experiencing within your mixes. As mentioned before, use your ears and make sensible decisions on what exactly each track is bringing to the overall sound of your mix, as with everything in music production…there are no hard and fast rules – so get experimenting!
If you have made use of these techniques within your mixes please leave us a message below or tweet us on Twitter.

Very helpful. Thanks for your work posting this.