
Best Audio Interface for Pro Tools in 2018
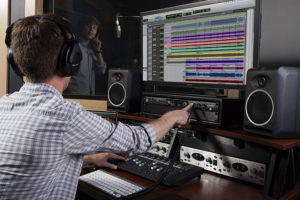 Most modern day project studio setups are centered around a computer, an audio interface and a plethora of MIDI devices and musical instruments. Contrary to classic studio setups where the centerpiece of the studio was the console, most project studios nowadays use an audio interface for mic preamps and the analog to digital conversion process, and then all the routing happens inside of a DAW like Pro Tools.
Similar to consoles, audio interfaces usually come with some mic inputs, some ¼” line inputs and several outputs; some even have MIDI inputs and outputs. To properly appreciate what an audio interface can do we must understand what happens to an audio signal that enters the device. Let’s imagine a scenario in which we are recording vocal overdubs for a song:
Microphone Preamps
We have a microphone set up, the artist is ready to record and after a deep breath we record arm a track and start recording. Signal flows from the microphone into a mic input and preamp of the audio interface. The mic preamp allows us to amplify the low level mic signal to get it to a working level. We achieve this by increasing the voltage amplitude of the incoming electrical signal. This enhances the signal a lot and the way the preamp shapes the voltage curve has major sonic implications.
To conclude: the preamp changes the way a mic signal sounds – some more than others – and it is important to decide whether you want your mic preamp to add color to your recording or whether you want it to be as neutral as possible. Make sure to check out our article on the best microphone preamps to get on a budget.
That being said let us take a look at some awesome interfaces out there that will do wonders to your Pro Tools setup:
Keep reading further to get a breakdown of audio interfaces and more in-depth reviews of the above audio interfaces.
Analog to Digital Conversion Process
So our signal now has a healthy, working level and it is ready to be recorded. In order to get it to Pro Tools it must be converted from an electrical signal to a digital signal.
Per short, an audio interface does this by taking a lot of little “snapshots” of the electrical signal and then assigning numeric values to each “snapshot”. There are two parameters that define how accurately the digital signal will reproduce the electrical one: Sampling frequency and bit depth.
Sampling Frequency
 The sampling frequency is the number of “snapshots” the device takes of the electrical signal.
In order for an electrical signal to be reproduced accurately the sampling frequency has to be at least two times the highest frequency we want to capture. As the audible spectrum goes up to 20 kHz, the sampling frequency must be at least 40 kHz in order to capture the frequency content accurately. That being said all A/D devices have a sampling frequency a bit bigger than the minimum needed in order to make up for a phenomenon called aliasing. (Aliasing happens when a frequency higher than half the sampling frequency enters the A/D process and is wrongly understood by your system and converted to a lower frequency thus creating information that is not actually there in your signal)
Bit Depth
Audio signal in the electrical realm is a function of voltage over time and each “snapshot” your device takes is actually a value of voltage amplitude. Digital conversion takes that voltage value and approximates it to the closest point out of a set of possible values. The number of possible values is defined by bit depth – a good way to wrap your head around this is comparing this to the resolution of a digital image: the greater the resolution the better the quality of the image. Similarly, the greater the bit depth, the more voltage variation you can capture, thus getting closer to matching the variations of the original signal.
To Pro Tools and Back
 There are several types of connections that audio interfaces use for connecting to your computer. Some devices use USB, some FireWire and newer devices use Thunderbolt.
This connection carries the digital signal to Pro Tools and back to the interface and speakers for monitoring. All interfaces have a hardware buffer which means there will always be a bit of latency between the sound source being recorded and the monitoring. The buffer size defines how many samples the interface calculates at one time.
Keep in mind that there is a buffer for analog to digital conversion (going to Pro Tools) and a buffer for digital to analog conversion (going to speakers, headphones, etc.)
Outputs
So our singer put on a great performance, the mic signal was amplified by the preamp, we recorded it to Pro Tools after we converted it to digital audio all while sending our singer a headphone cue for monitoring. In order to play back the recorded performance the signal has to pass through a digital to analog conversion process and then travel to some of the outputs on the interface and then to speakers or headphones. The more outputs an interface has, the more flexibility for monitoring and using outboard effects.
What to Look For in a Pro Tools Audio Interface
Be sure to think deeply about why you are buying an interface and what kind of recording you will be doing with it.
Will you record orchestras or playing guitar by yourself? Nevertheless it is a good idea to buy an interface with more mic inputs than you need now as you never know what the future brings.
It is also a good idea to check if the audio interface you desire offers the possibility to increase the number of mic inputs by connecting via ADAT lightpipe to an external mic preamp module. While 24 bit, 44.1 kHz is good enough for most situations, the higher the sampling frequency and bit depth of the audio interface, the better the quality.
Also be sure to check that the interface has enough outputs and if the connection protocol is actually compatible to your computer. Do not forget that you need 48 V to power condenser microphones and active DI boxes so your interface should definitely have that on all mic inputs.
Best Audio Interfaces for Pro Tools
Focusrite Scarlett 18i20 (2nd Gen) Review

The whole Scarlett series is simply amazing quality. From the components to design, all the interfaces in the series are great products. Pristine and neutral mic preamps and 24 bit, 96kHz digital conversion make sure that your recordings will sound off the hook. Midi, S/PDIF and ADAT i/o are big pluses for this interface, the only drawback being that it uses USB 2.0 which is not as speedy as Thunderbolt or FireWire.
Steinberg UR 824 Review
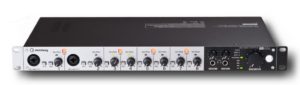
The UR 824 is the perfect tool to start your studio around. It is equipped with really cool Yamaha D-Pre mic preamps and can convert to digital audio at 24 bit, 96 kHz – this is quality. It comes standard with 8 analog inputs and 8 outputs but you can extend that to 24 by 24 if you connect external mic preamp modules via the two pairs of ADAT i/o.
PreSonus AudioBox 1818 Review
Like the previous two interfaces, this one is part of a series and all products from the AudioBox series share similar specifications – XMAX preamps, 24 bit, 96 kHz digital conversion, ADAT i/o, MIDI i/o – What else do you need? This interface comes as an 8 by 8 analog i/o system and will make music making a treat.
Universal Audio Apollo Quad Review
This one is a bit of a different animal – it is designed to be extremely high end and completely dedicated to professional integration in a studio. It only has 4 mic inputs but the preamps are incredible and you get an extra 8 line inputs and a total of 10 line outputs. It converts to digital and back at a staggering 192 kHz sampling frequency running on a 24 bit system. The big attraction is that it uses DSP cards to take the load of the CPU and do all the processing in the device itself.
Native Instruments Komplete Audio 6 Review

Smaller than a book but cooler than most of the things I have seen on the market. This device is a production station and it is designed for production work and not large recording sessions. You get four analog inputs (two XLR combo, two balanced line), four balanced outputs, S/PDIF i/o and MIDI i/o which is very versatile. USB powered and 24-bit/96 kHz recording all at a fairly small price – what else does a producer need? Native Instruments really packed a lot into this little beast.
Final Thoughts
There are a lot of other great products on the market and these are simply some of the best audio interfaces for Pro Tools judging by the quality you get for your investment. The audio interface you buy is as important as the computer you use for Pro Tools if not more important. It will shape everything your record with it and having all the features needed for your setup is necessary in order to facilitate good workflow.
Other manufacturers totally worth checking out are MOTU, RME, AVID and M-Audio. I hope that all this information will help you when making the extremely important decision of buying an audio interface.
This article doesn’t address the issue of drivers, which is a massive consideration for Windows users.
Also, on board DSP is a requirement for me these days.
Hey, i want to have a cheap little set up for home and was thinking of pro tools first and something like this: Behringer U-PHORIA UMC204HD, is this interface ok to work with pro tools?
Also, and it’s undoubtedly a newbie questions, would pro tools separate the two inputs on the interface above if used simultaneously and record separately, i.e. guitar and vocals, or does it record it as one input. Sorry if that’s a silly question but i am very new to this.
Please guide me to establish my own set up.