
Sync Points
Introduction
Synchronicity within a Pro Tools session is usually something pretty important, whether it be the placement of a foley effect within a film soundtrack, or a kick sample in time with the original.
You will no doubt have experienced locking the start or end of a clip to a grid within Pro Tools, but what about when we want to snap a transient within the clip to a grid without cutting it short? In walks Sync Points.
Sync points can be added to any MIDI, audio, and video clips, not forgetting clip groups either. These points allow you to align a specific point of the clip to the grid of your sessions within Grid and Spot mode.
Note: Sync points can also be used to align a clip point to a particular SMPTE or Bar/Beat location as well.
Defining Sync Points
Firstly you will want to enable Slip Mode, if you are not sure how then you may want to read our article on Edit Modes before continuing on.
Using the Selector tool, click on the point within a clip that you would like to sync to.
Note: I like to use the Tab To Transient tool when wishing to highlight the very beginning of a transient. You can learn about that here.
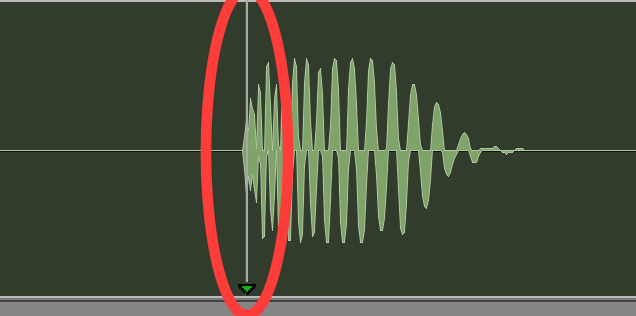
Next, from the Clip menu select Identify Sync Point as shown below.

You should now notice a small arrow at the bottom of the clip with a vertical grey line defining the sync point location.
It should be noted that if you perform this again at a new location within a clip already holding a sync point, the sync point will move to the new position, a single clip can only hold a single sync point.
So you have your first sync point working! Give it a go, you should find that in Grid Mode your clip Sync Points now snap to the grid as opposed to the clip start/end.
Deleting Sync Points
There may be occasions where you no longer need a sync point and want to remove them, thankfully this is as simple as it is creating them and can be done in one of two ways.
The first, and easiest, way we can delete a point is to highlight the clip containing one and then got to Clip > Remove Sync Point as shown below.

The second way to delete them is to chose the Time Grabber Tool, then while holding Option (Mac) or Alt (Windows) click the sync point.
Show / Hide
One little ‘gotcha’ you may run into within your sessions is finding that the sync points of your audio clips are hidden. Whether they are hidden and you wish to show them, or they are visible and you wish to hide them, the menu option is the same.
Go to View > Clip > Sync Point as seen below.

Bit of a strange one, but something that can waste some valuable time if you’re sat scratching wondering where they have gone!
Dragging Sync Points
If you wish to move sync points manually, you can do so again in one of two ways.
The first is useful when you want to snap a sync point to a grid location, in this case you can enable Grid Mode and use the Time Grabber Tool to drag the sync point to a new location.
The second, and more precise, method of dragging a sync point is using the scrubbing drag. If there is one thing we should always try and remember while mixing in a digital audio workstation, it is to always trust our ears and not our eyes, this is why the scrub tool has its advantages as we can scrub up to the point we audibly hear where we wish to place the sync point.
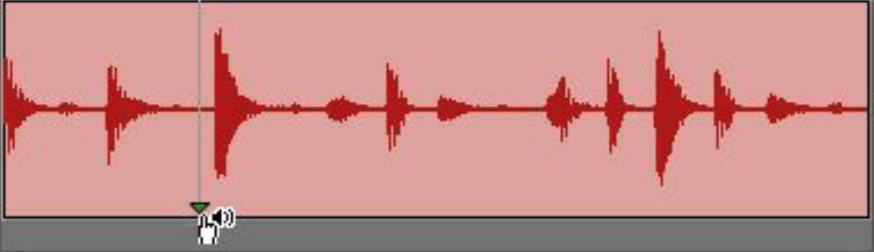
Using the Scrubber tool while holding the Control key, we can grab the sync point arrow and move it manually to where we feel it sits best. You will notice in this case that the cursor changes to a symbol of a hand and speaker as shown below.
Final Words
Sync points are something I use endlessly within sessions, particularly during film post production foley work, it really is another one of those priceless tools to have on your belt when stepping into any kind of session where timing is key!
We hope this article has made clear the possibilities that this feature offers, but more importantly has given you the knowledge to use it confidently in your next mix!
As ever if you have have any comments or questions, please do drop us a message below, or say hi on Twitter!

thanks for this… just watched a video about them as well that showed how if you place the play head in the timeline (for example on a certain timecode) and then go the region that has a sync point in it and hold down control and shift and click that region the sync point will get lined up with the playhead location in the timeline… handy shortcut!