
Hardware Setup
Introduction
In this tutorial we are going back to basics covering one of the very first processes you will have to perform after purchasing a copy of Pro Tools, hardware setup.
You’ve just received your copy of Pro Tools, popped the discs in and installed the software but are now unable to record anything or on some systems even unable to boot up the software at all as it cannot find your hardware, this tutorial will explain how to get setup and ready so you can spend the time recording and mixing as you should!
Drivers
Before we start looking at the Pro Tools side of things we need to make sure the appropriate drivers have been installed, for those who are not aware, a driver is a small bit of software which allows your computer and hardware device to talk to each other.
Most of the time a disk should come with your hardware which should have everything you need on it, but this isn’t always the case. Thankfully in this modern digital age where downloads favour over disks, most drivers nowadays are just a click away from a search engine, I won’t go into details here for places to obtain drivers as there are simply too many, but if you are really struggling then please don’t hesitate to get in touch and we can point you in the right direction.
Note: Bottom line of this section, the best start to avoid issues later on is to grab and install your drivers first.
Setup
So now we have our drivers installed, we can open up Pro Tools and get stuck in.
With the software loaded up, scroll across the menus at the top until you find one labelled ‘Setup‘, from there navigate to ‘Hardware…‘.

Setup > Hardware
You will then be presented with the ‘Hardware Setup‘ window as shown below.
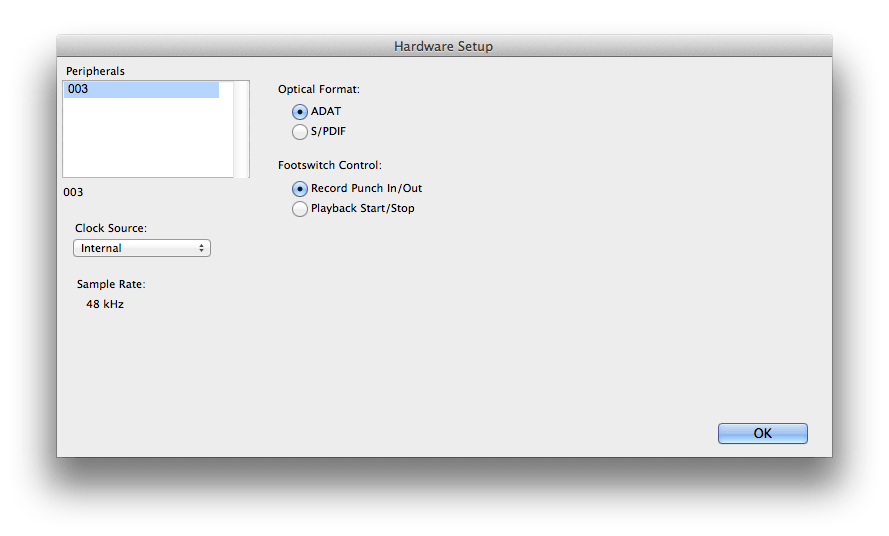
Hardware Setup Window
The left hand window will show a list of ‘Peripherals’, this is basically a list of all the devices which Pro Tools has found that are capable or recording and playing back sound within your sessions, if your device is not listed here there is a fair chance you haven’t got the correct drivers installed (see above) or even more simply have not yet attached the device correctly, sometimes something as simple as unplugging and then reconnecting a cable can fix an issue!
Once you have clicked on the device you wish to use, a range of options will show to the right hand side of the window, for HD Avid interfaces you will be able to configure the digital I/O format, default sample rate, signal routing, clock source, and a few other settings depending on how many other devices you have connected to your system.

HD Interface Hardware Setup
For non HD interfaces (excluding third party devices), devices such as the Mbox 2 or Digi 003, you can configure the signal routing, sample rate, clock source, and digital I/O format.
Third generation Mbox units as well as third party Core Audio (Mac) and ASIO (Windows) interfaces will need to be set up independently, this setup can be easily achieved by clicking ‘Launch Setup App‘ from the Hardware Setup window which will open a control panel on your system for that specific device.
Feeling Aggregated
If you are a Macintosh owner using Core Audio, you may have noticed an option within your hardware peripheral list labelled ‘Pro Tools Aggregate I/O‘, this was a new feature introduced in version 9 of Pro Tools which will allow you to make use of the built-in inputs and outputs of your Mac computer, so for those who don’t need the large amount of inputs and outputs that external hardware can offer, you can still make your recordings without spending the extra money…
The aggregate inputs and outputs can be configured from within ‘Mac Audio Setup’ as shown in the image below.
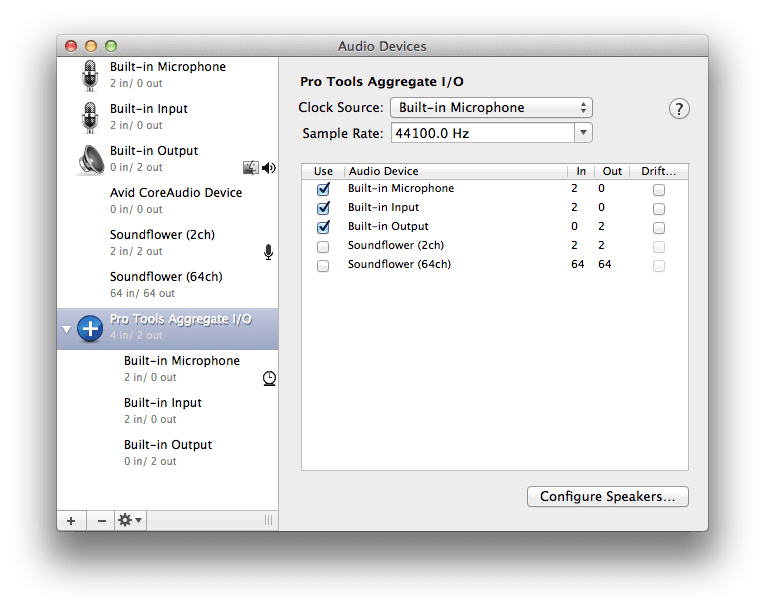
Macintosh Audio Setup Window
This window can be easily accessed from the Pro Tools hardware setup window by selecting the aggregate peripheral from the list and then clicking the ‘Launch Setup App’ just as we mentioned earlier.
Note: The Pro Tools Aggregate device is intended solely for use with your internal Mac inputs and outputs, for best performance you should resort to the default settings.
Default Sample Rate
We mentioned earlier that after you select your hardware from the peripheral list you will be presented with a range of options, one of which is the Sample Rate.
This option allows you to set the default sample rate when a new session is created, this setting is only available when there is no Pro Tools session open. If you looked at this section while a session was open, it would simply display the sample rate of that current session and would not allow you to change it until that session is closed.
Note: You are of course still able to set the sample rate when creating a new session, these hardware setup options simply save you the hassle of having to select each time.
Pro Tools HD and HD native hardware allows you to change the default sample rate from either the hardware setup window or the playback engine, it should also be noted that the sample rate setting on HD systems can have an affect on the number of voices available within your sessions.
Clock Source
For those who are not aware, a ‘clock’ within Pro Tools refers to a signal which allows all of your external devices to run at the same time. Say you are running a session at 44100Hz, all of your pieces of hardware need to know when to kick off together so that everything is running in sequence, a system without some form of clock could result in an unsteady time/pitch during playback as well as constant digital bursts.
Clocks can come from a range of places, systems with a single piece of hardware can function with an internal clock within the system, whereas larger HD rigs for example with lots of I/O units may require a sole clocking device such as a ‘Big Ben’ or a ‘Digidesign Sync I/O’, the usual setup in this case is to connect each devices in a loop as shown below.

Big Ben Clock Loop
Clocks alone can be a deep subject, so while that information is useful to know, this tutorial will go as far as the brief explanation above, as well as how the clock source can be changed when setting up your hardware.
Note: Any changes you make to the clock source in the session setup window will change those in the hardware setup window, and vice versa.
So now we know the basics of what a clock source is within your systems, lets take a look at a few of the likely options you will come across.
Internal: If you are just recording an analogue signal (such as recording a guitar connected via 1/4″ jack to your interface) you will have no issues with using an internal clock source, this is the most commonly used within small home setups where few external devices are in use.
External: External clock options can come in all sorts of formats depending on your hardware options, these can include S/PDIF, AES/EBU, Optical, TDIF, ADAT, Word Clock, and AES/EBU 1-8. This form of clocking would be beneficial when transferring material from another external digital device into Pro Tools so that they can both run in synchronicity with one another. It should be noted that your external digital device must be connected and powered up for Pro Tools to initiate a synchronisation with it, should this not be the case, you should resort to the internal clock option.
Footswitches
If you are making use of either a 002 or 003 peripheral, you may have noticed an option labeled ‘Footswitch Control’, this relates to a 1/4 jack on the back of the device allowing you to connect a relevant pedal (such as that of a piano sustain pedal) to control either recording or playback within Pro Tools.

Footswitch Control
The two options available here are as follows, Record Punch In/Out: as you may have guessed this will allow you to use the footswitch to initiate or end a punch in while recording, it should also be noted here that this works for both recording audio and MIDI data.
The second option available is Playback Start/Stop: just as it says on the tin, this will either start or stop playback within your session. These may seem like a bit of a novelty, but trust me when you have your les paul in your hand as well as a pair of headphone on your head, having a switch within foot reach is much easier than stretching across to your keyboard.
Identifying Hardware
So you have two or three hardware peripheral working within your setup, but how do you know which once your affecting when they’re labelled #1, #2 and so on….Thankfully this has already been thought of to save you making mistakes when defining inputs and outputs for example.

Hardware Indentify
In the hardware setup window, which i’m sure you should be very familiar with now, select an interface from the peripheral list, providing it is a compatible piece of hardware for this feature you should notice a small checkbox in the bottom left-hand corner labelled ‘Identify’, this will illuminate all of the LED’s on the front panel of that given device so that you can decipher which is which, another feature which may not seem exciting at first, but it saves you having to look around the back and see where all of your connections are!
Final Words
We hope that you have found this article useful, while most just want to ignore the whole setup procedure and simply start recording and mixing, the unfortunate truth is that careful time spent at the beginning of a session making sure your hardware is working as it should will save you endless amounts of time trying to problem solve later on.
If you have have any comments or questions, please do drop us a message below or say hi on Twitter!

What can these AES/EBU ins and outs be used for?
What version is this? I’m using PT 12.5 and the format is different on these Hardware Setup windows…
I also have a protools 12 trying to connect my ADAT but Hardware Setup is not show the option to change my hardware nor samplerate.