
Editing Techniques in Pro Tools
In this digital era, the capabilities we have with our DAW’s are simply off the charts – and editing is one of the processes that are immensely facilitated by digital audio. No wonder they call it Pro Tools as it has so many tools we can use to edit audio and MIDI clips. We can cut up audio clips, add them together on new tracks, create smooth transitions and basically play around with audio with almost no limitations what so ever. We will take a look at all the basic edit tools found within Pro Tools.

Trimmed Track With A Crossfade Between Them
Edit Modes
Yes, we do have another article on this topic on our website but it is impossible to do a proper tutorial on editing techniques without discussing edit modes. Why? As their name suggests, they are meant to be used in different scenarios of editing. Let’s go through a quick rundown of how each mode works:
- Shuffle – This mode will make any clip you move snap boundaries with the first clip on to the left.
- Slip – This mode allows you to trim and move clips without any limitation or grid.
- Grid – This mode will make any trimming or moving operation respect a time value determined by the tempo value and the grid increment you select for the session.
- Relative Grid – This mode allows you to move clips which do not respect absolute grid values by increments determined by the grid.
- Spot – This mode allows you to place clips at very exact positions in time by manually introducing the time position of each clip.
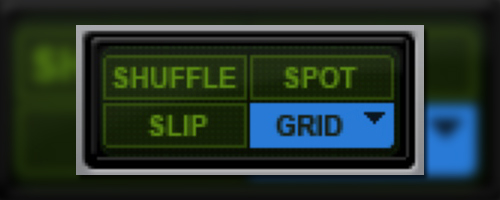
Pro Tools Edit Modes
But wait there’s more! You can actually combine the modes between the when you want a little bit of one and a little of the other. This modes are called snap to grid modes and can be engaged by clicking on grid and then shift clicking on any other mode. Behavior varies from mode to mode. Slip + Snap To Grid is probably the most useful as you can make selection based on the grid but you move the clips freely wuth no grid restriction.
Creating Clips
Beyond recording there are other ways to create clips through editing – quite a lot actually. There are two categories of clip creation tools – those that modify the source clip and those that don’t. Let’s start with the first category. There are two command that fall into it:
- Capture Clip: This command creates a new clip out of the selection you have made on a source clip, creates a dialog to enable you to name the clip and then adds it to the clip list.

Capture Clip Dialog
- Copy: What? Copy creates clips? Yes, it does – and every time you copy a selection or a whole clip Pro Tools automatically creates a new clip and defines a name to it.
Moving on to the commands that actually alter the source clip:
- Separate Clip At Selection: This command breaks up the clip in two where the selection marker resides. Pro Tools automatically names the two clips.
- Separate Clip At Transients: This command makes Pro Tools analyze the waveform, detect the transient information in it and then slice up the selected clip after each transient spike.

Separating A Clip At Transients
- Separate Clip On Grid: This command breaks up a selected clip into multiple clips, each one as long as one grid increment. If you have quarter notes selected, it’s gonna divide a clip into quarter note long clips.

Separating A Clip On The Grid
- Consolidate Clip: More often than not you end up with a bucket of clips after an editing session and this command allows you to make on coherent clip out of any number of clips on a track.

Also in the category of source editing techniques are Beat Detective and Audiosuite Processing. However these are more than just editing tools (Audiosuite processing can’t even be called an editing tool!).
- Beat Detective: This amazing tool in Pro Tools enables you to analyze tracks, separate them into bar, beat and sub-beat clips and then quantize them to the grid.
[toggle title=”Video: Using Beat Detective To Edit Drums”][youtube id=”AFw8dYilH74″ width=”600″ height=”340″ position=”left”][/toggle]
- Audiosuite Processing: This is actually printing new files of audio that has signal processing applied opposed to using the plug-ins on tracks – an amazing way to free up CPU power.
Arranging Clips, Trimming and Creating Fades
There are a lot of ways to place clips on tracks and some of them are really powerful. Let’s take a look at what options we have:
- Loop: This command enables you to loop a clip any number of times and you can set the loop number via a dialog.
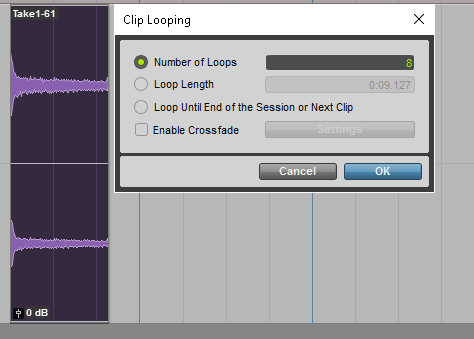
Loop Dialog
- Repeat: This command does the same thing as loop but does not allow for later editing of the number of repeats by invoking the command again as opposed to loop.
- Duplicate: This command allows you to crate identical copies of a clip and Pro Tools places them right next to the selected clip. Very useful for making repetitive arrangements.
- Drag: You can drag any of the clips you create or import from the clips list/ workspace browser to any track that supports the format of the clip.
To get your clips to work well with one another after placing them on tracks more often than not you need to trim their length. This can be done in more than one way, of course. One way to do it is by using the trimmer tool to adjust the tops and tails of a clip. Another way is to use the selector and delete any section of the clip you want to trim. Yet another way is by using the “Trim” menu in the “Edit” tab.

The Trim Menu
The last thing to do after carefully editing and placing all your clips is making sure that they all have smooth transitions between them – that’s done by using fades. There are four ways to create fades:
- Using The Fade Command: After selecting a terminal portion of a clip or two terminal portions of different clips you can invoke the Fade command and a dialog window enables you to define the parameters of the fade.

Fade Dialog
- Using The Smart Tool: With the smart tool you can easily create fade ins, fade outs and crossfades but without the flexibility of the the Fade command.
- Batch Fades: This command allows for automatic creation of crossfades between looped clips or Beat Detective separated clips. It is invoked either in the loop dialog by selecting crossfades or from the Beat Detective window by selecting smoothing.
- Quickpunch Auto Fades: Whenever you are using Quickpunch to record, Pro Tools automatically adds fades in and out of clips.
Final Thoughts
Learning all these basic editing tools will be the greatest workflow knowledge you will ever learn when it comes to working with Pro Tools. Whether you are recording, mixing, editing or composing these edit tools are invaluable and will greatly reduce the time you spend messing with clips and getting them into working order.